
Click on the Buttons below to view all of Curt's Web pages
Woodturning Tips
Woodturning Tips Page
Table of Contents (Click on a Button)
Tips from Curt Norman's Shop
Woodturning Aspect Ratio Tips
Sand Paper Tips
Woodturning Tips from Curt Norman's Shop
1. Keep the tool rest smooth.
Any impressions on the surface of the tool rest will be transmitted or carried over to the cutting edge of the tool.
Remove any dings or pits on the tool rest with a mill file then sand, buff and wax the surface. Use a straight edge on the top of the tool rest to make sure it remains true or straight from one end to the other.
2. Always rotate your turning stock a full 360 degrees before powering up the lathe.
Make sure the tool rest, tool rest banjo and the lathe bed are clear of the turning stock when you hand rotate the spindle a full revolution.
3. Adjust the tool rest parallel to the lathe bed for making straight cuts on the turning stock.
To make the tool rest straight between the head stock and the tail stock, just eye ball over the tool rest and adjust it parallel with the lathe bed.
4. Hold the tool at the tool rest overhand.
Using the overhand technique to guide the tool at the tool rest allows your hand to be closer to the cutting edge, which in turn gives you better control of the tool.
5. Hold the tool handle on your side or hip for support.
Use your body to get maximum tool control by holding the tool handle on your side. Move your whole upper body with the tool moving down the tool rest.
6. To start the cut with a Bowl Gouge on the inside of the bowl turn the flute straight out “(“ to start with and then roll it about 30 to 40 degrees.
To avoid getting a “run back” with the gouge on the inside cut of a bowl, start with the flute straight out “(“ until there is enough of an edge for the bevel to ride on and then turn the flute open for a normal cut.
7. Do not over-reach with the tool over the tool rest. (See the Chart Below)
Adjust the tool rest close to the turning stock. Use this chart below for the maximum distance your tool can safely reach beyond the tool rest.
8. Mark the number 1 chuck jaw with paint for easy identification.
Always mark and remount the turning stock in the chuck the same way you removed it by putting a pencil mark next to the number 1 chuck jaw.
9. Make a jig for maximum & minimum opening for each chuck size. (See the Picture Below)
Use a measuring jig to make sure the size of the tenon you're cutting will fit the chuck opening. (Make the jig for both inside and outside chuck sizes)
10. Sand the woodturning from the under or lower side and move the tool rest away.
Try to sand the woodturnings from the lower or under side when possible so the turning direction is away from your fingers and not into them. With a variable speed lathe, sand at a lower speed. With the lathe in reverse sand over the top side. Always move the tool rest away to avoid finger pinching.
11. Always use a dust collection system and/or a dust mask every time you turn or sand.
A dust collection system in a wood shop is essential… A necessary requirement… A health issue…
The canister type filter is superior to the bag filter. The canister type filters the air to 1 micron
Bowl Gouge Spindle/Detail Gouge Roughing Gouge
Size Max. Reach Size Max. Reach Size Max. Reach
3/8” 1 1/2” 1/4” 3/4” 3/4” 1 3/4”
1/2” 2 1/2” 3/8” 1” 1 1/4” + 1 3/4”
5/8” 3 1/2” 1/2” 1 3/4” (Chart from Craft Supply USA)
3/4” + 4” 9/16” 1 3/4”
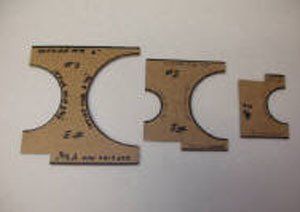
Question # 9 Measuring jigs for chuck openings
Curt Norman, January 2005
Geometry of Woodturning
The Golden Rectangle The 1/3 Diameter Rule
*(Aspect Ratio 1:1.618033) **(1/3 from Top or Foot Dia.)
Diameter *Height Diameter **Dia. / 1/3
1 1.618 1 0.333
1.5 2.427 1.5 0.495
2 2.236 2 0.666
2.5 4.045 2.5 0.825
3 4.854 3 0.999
3.5 5.663 3.5 1.155
4 6.472 4 1.332
4.5 7.281 4.5 1.485
5 8.09 5 1.665
5.5 8.899 5.5 1.815
6 9.708 6 1.998
6.5 10.517 6.5 2.145
7 1 1.326 7 2.331
7.5 12.135 7.5 2.475
8 12.944 8 2.664
8.5 13.753 8.5 2.805
9 14.562 9 2.997
9.5 15.371 9.5 3.135
10 16.18 10 3.33
11 17.798 11 3.663
12 19.416 12 3.996
13 21.034 13 4.329
14 22.652 14 4 .662
15 24.27 15 4.995
16 25.888 16 5.328
17 27.506 17 5.661
18 29.124 18 5.994
19 30.742 19 6.327
20 32.36 20 6.66
*The height should be 1.618033 (Phi) times the diameter
**The largest diameter of the piece should be located
1/3 of the distance from the Top (or Bottom)
**The diameter of the Base should be approximately
1/3 the maximum diameter of the piece
Woodturners Golden Rectangle (Aspect Ratio).xls
Curt Norman 9/09
Sanding Tips from Curt Norman's Shop
Aluminum Oxide
sand paper is one of the most common wood working abrasives. It exhibits a high degree of friability.
Which means when heat and pressure are applied it fragments. This is highly desirable because when it fragments it creates new sharp edges. This self-renewing property allows Aluminum Oxide to last longer than most other sand papers.
Garnet
sand paper is a natural abrasive that is still commonly used for woodworking. It is not friable and tends to wear out fast.
However Garnet will produce a smother finish than other sand papers with the same grit number. So garnet is a great choice for the final sanding.
Silicon Carbide sand paper is harder than both Garnet and Aluminum Oxide. It's great for sanding harder materials like metal and plastics. It is also a friable abrasive but wood is not hard enough to fracture the surface. Which means it will wear out faster than Aluminum Oxide if used on wood.
Remember this about Sanding & Sand paper
No Load Aluminum Oxide is a great choice of sand paper for wood working.
No load, Stearated or Zinc Lubricated sand paper helps reduce the sanding grit from clogging.
Sand paper works a lot like a saw or chisel or other cutting tool in your shop. The only real difference is you can not sharpen sand paper.
You must replace it with a new peace. Example; Worn-out 220 grit can not be used for 320 grit. Even though the paper is warn-out there will still be some 220 grit abrasive grains on the paper so it will not sand like 320 grit. Through it away!
Sanding influences the final finish. No finish can be better than the surface under it.
Don't buy cheep sand paper. Grit control costs money!
Klingspor's Woodworking Shop has quality sand paper and very competitive pricing. woodworkingshop.com
Use dust collection and/or a dust mask every time you sand!
Curt Norman 2/07